In this tutorial, I will show you the steps I took to Design an Interesting Cloud Text Effect in 3 Easy Steps in Photoshop. We will mainly use custom brushsets and utilise brush options to achieve this text effect. This is a beginner level tutorial, have a try :)
Note: The Photoshop tutorial is done in CS6 – therefore some screenshot may have slighting different layout as in the earlier version. Some brushes are exclusive to Photoshop CS6.
Here is a preview of the final effect I have for this tutorial: (click to enlarge)
PSD File Download
You can download the PSD File for this tutorial via the VIP Members Area for only $6.95/Month (or less)! You will not only get this PSD File, but also 100+ other PSD Files + Extra Goodies + Exclusive Photoshop tutorials there. Signup now and get exclusive :) Find out more about the VIP Members Areas
OK Let’s get started!
To complete this tutorial, you will need the following stocks:
Step 1
Create a new document sized 1400px * 700px, grab the Gradient Tool and fill the background layer with a light blue gradient:
Click to enlarge the following screenshot to reveal the colour code:
Use the cloud brush set you downloaded, paint some white cloud on a new layer and we will use this as our background:
Step 2
We will type some texts onto our canvas, I used the “Lucida Handwriting” font that comes with Photoshop:
Load the smoke brush into Photoshop and use the following set:
Press “F5″ to bring up the brush options window, apply the following setting:
Shape Dynamics
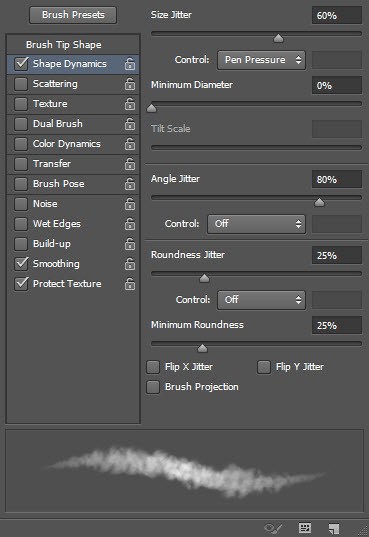
Make sure you tick the “Smoothing” and “Protect Texture” option.
Use the brush, gently paint over the text as shown below, adjust the brush size accordingly:
Turn off the original text layer, and you will have the following effect:
Then on this newly painted cloud layer, apply the following “Bevel and Emboss” layer blending effect:
and here is the effect so far:
Step 3
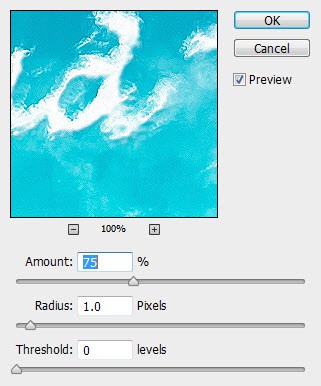
We will add some retouches to this effect. To make text slightly sharpen, we flatten the image and apply the following “Unsharpen Mask” filter (Filter > Sharpen > Unsharpen Mask):
We can paint some cloud under the text, just to make the text look like floating above the cloud:
Load the hot air balloon PSD File into Photoshop and add some hot air balloons into the image:
Finally we can use the same brush in step 2 to add some extra cloud texture around the text:
and here is my final effect: (click to enlarge)
That’s it for this tutorial! Hope you enjoy it and find it useful! Till next time, have a great day!
No comments:
Post a Comment