Simple Pop Art Effect With Photoshop
Written by Steve Patterson. In this Photoshop Effects tutorial, we’re going to see how to turn a photo into a simple 1950′s and 60′s pop art-style effect. If you can make a selection with the Lasso tool and you understand the basics of using layers in Photoshop, you have all the skills needed to create the effect. We’re going to be using the Lasso tool, or the selection tool of your choice, a simple Threshold image adjustment, and a lot of solid color fill layers.
Best of all, when you’re finished, all of the colors in the effect remain completely editable, so you can go back and change them any time you want, or make multiple versions of the same image using different colors, which is a popular thing to do with this effect.
Here’s the image I’m going to be working on throughout this tutorial:
And here’s the pop art effect we’re aiming for:
Let’s get started!
Step 1: Draw A Selection Around The Main Subject Of Your Photo
In order to create our pop art effect, we need the subject of our image to be separated from its background and placed on its own layer above the Background layer, which means we need to first select the main subject.
You can use any selection tool you want here because you don’t have to be overly precise with your selection, since we’re going to be removing most of the details from the image anyway. I used the Lasso tool, but if you prefer the Pen tool, for example, that works too. Go ahead and draw a selection around the main subject of your photo:
Draw a selection around the main subject of your photo using the selection tool of your choice.
Step 2: Copy The Main Subject Onto A New Layer
With the main subject of your photo selected, use the keyboard shortcut Ctrl+Alt+J (Win) / Command+Option+J (Mac) to copy the selection onto its own layer. Adding that Alt/Option key into the keyboard shortcut tells Photoshop to first give us the New Layer dialog box so that we can name our layer before it’s created:
Press “Ctrl+Alt+J” (Win) / “Command+Option+J” (Mac) to bring up Photoshop’s “New Layer” dialog box”.
I named my new layer “threshold”, and we’ll see why in just a moment. Click OK when you’re done, and Photoshop copies your selection onto a new layer above the Background layer:
The selection now appears on its own layer above the Background layer.
Step 3: Add A Solid Color Fill Layer Below The New Layer
Now that we have the main subject on its own layer, we’re going to hide the background from view and replace it with a solid color. First, click on the Background layer to select it. Then, with the Background layer selected, click on the New Fill Or Adjustment Layer icon at the bottom of the Layers palette:
Click the New Fill Or Adjustment Layer icon at the bottom of the Layers palette.
We want a solid color behind the main subject, so select Solid Color from the top of the list that appears:
Select “Solid Color” from the top of the list.
This brings up Photoshop’s Color Picker. Go ahead and choose any color you want right now for the background. It doesn’t matter which color you pick because, as we’ll see later, you can always go back and choose a different color any time you want. I’m going to choose a light blue for now:
Choose a color for the background with the Color Picker.
Click OK when you’ve chosen a color to exit out of the Color Picker. Here’s my image with my solid colored background:
The main subject now on a solid colored background.
And I can now see in my Layers palette that I have a solid color fill layer between my Background layer and the "threshold" layer:
A solid color fill layer appears in the Layers palette.
Step 4: Use The Threshold Adjustment To Remove The Detail From The Main Subject
Next we need to convert the main subject to black and white and remove most of the detail, and we can do that easily using Photoshop’s Threshold adjustment. First, click back on the “threshold” layer to select it in the Layers palette. Then, go up to the Image menu at the top of the screen, select Adjustments, and then select Threshold. This brings up the Threshold dialog box:
Photoshop’s “Threshold” dialog box.
Drag the slider at the bottom of the Threshold dialog box (circled in red above) until you’ve removed most of the details from the image, leaving just enough to still be able to make out the main areas. In my case, I’ve left just enough detail to still be able to make out the girl’s eyes, nose, mouth, and so on, yet the majority of the image detail is now gone:
The image after applying the Threshold adjustment. Most of the detail is now gone.
Click OK when you’re done to exit out of the Threshold adjustment.
Step 5: Select The First Area Of Your Subject To Colorize And Copy It To Its Own Layer
In order to create the pop art effect, we need to be able to colorize the different areas of our main subject separately from each other, and in order to do that, we need to select each area and place it on its own layer. Again, using the Lasso tool or the selection tool of your choice, draw a selection around the first area of your main subject that you want to colorize. I’m going to start with the girl’s hair:
Selecting the girl’s hair with the Lasso tool.
Next, with her hair selected, I’m going to copy her hair onto its own layer, using the same keyboard shortcut as before, Ctrl+Alt+J (Win) / Command+Option+J (Mac), which brings up the New Layer dialog box once again. Give this layer a descriptive name. I’m going to name mine “hair”:
Give your new layer a descriptive name.
Click OK, and Photoshop adds the selection onto its own layer above the “threshold” layer:
The girl’s hair is now copied onto its own layer above the “threshold” layer.
Step 6: Continue Selecting All Areas And Copying Them To New Layers
Continue making selections around each of the areas that you’re going to want to colorize separately and copying each area onto its own layer until you’re done. Make sure you click back on the “threshold” layer each time after you’ve made a selection, and then use the same keyboard shortcut, Ctrl+Alt+J (Win) / Command+Option+J (Mac) to copy the selection to its own layer. Also, make sure you give the new layer a descriptive name.
I’ve gone ahead and made selections around each area of the girl I’m going to want to colorize and I’ve copied each area onto its own layer in the Layers palette:
Continue selecting each area you want to colorize and copying it to its own layer until you’re done.
Step 7: Colorize Your First Section With A Solid Color Fill Layer
With each of the sections we want to colorize selected and copied onto their own layer, the hard part is done. We’re now at the fun and easy part – colorizing each section. To do that, we’re going to give each section its own solid color fill layer. I’m going to start at the very top of my Layers palette with the girl’s hair.
First, I’m going to click on her “hair” layer in the Layers palette to select it. Then, I’m going to hold down my Alt (Win) / Option (Mac) key and click on the New Fill Or Adjustment Layer icon at the bottom of the Layers palette:
Hold down “Alt” (Win) / “Option” (Mac) and click the “New Fill Or Adjustment Layer” icon.
Then, while still holding Alt/Option, select Solid Color from the top of the list:
While still holding Alt/Option, select “Solid Color” from the top of the list.
Holding down the Alt/Option key tells windows to bring up the New Layer icon for us before adding the solid color layer. Give your solid color layer a descriptive name. Since mine is going to be used to colorize the girl’s hair, I’m going to name mine “hair color”.
Also, make sure you select the Use Previous Layer To Create Clipping Mask option this time:
Choose the “Use Previous Layer To Create Clipping Mask” option to prevent the color from covering the entire image.
If you don’t select it, your solid color will cover the entire image, which isn’t what we want. Choosing this option will make sure the color only fills the area inside the selection, which in my case here is the girl’s hair.
Click OK, and Photoshop’s Color Picker appears. Again, choose any color you want because you can go back and change it any time. I’m going to choose orange for her hair, and then click OK.
I can now see my orange solid color fill layer above the “hair” layer in the Layers palette. It’s indented to the right and has a small down-pointing arrow on the left to indicate that it’s being “clipped” by the layer below it, preventing it from covering the entire image area:
The solid color fill layer now added above the “hair” layer.
Here’s what the girl’s hair currently looks like:
The girl’s hair is now filled with orange.
Step 8: Change The Blend Mode Of The Solid Color Fill Layer To Multiply
Her hair is now orange, but there’s a problem. The orange is covering all of the black areas that were in her hair. To fix that, with the orange fill color layer selected, go up to the layer blend mode options at the top of the Layers palette, click on the down-pointing arrow to the right of the word “Normal”, and change the blend mode for the orange fill color layer to Multiply:
Change the blend mode of the fill color layer from “Normal” to “Multply”.
Now the black areas in her hair are visible once again:
The black areas in her hair are once again visible.
Step 9: Continue Adding Solid Color Fill Layers For Each Section
Repeat steps 7 and 8, adding solid color fill layers for each section, remembering each time to select that Use Previous Layer To Create Clipping Mask option in the New Layer dialog box so that your fill color affects only that specific selection and not the entire image. Again, feel free to pick any colors you want for each section since you can always change them. When you’re done, you should have a solid color fill layer above each section’s layer in the Layers palette, and your image will be completely colorized.
Remember that layers higher up in the Layers palette can block lower layers from view, so you may have to click and drag some layers above others in order to colorize them if some sections in your image are overlapping.
Here’s my image after adding a solid color fill layer to each section and changing the blend mode of each one to "Multiply":
The image after adding a solid color fill layer to each section.
The pop art effect is now complete, and the nice thing is, I can now go back and change any colors I want, as we’ll see next.
Step 10: Change Any Colors You Want Whenever You Want
The nice thing about the way we’ve accomplished this effect is that each of our colors is a separate fill layer, and fill layers are always “live”, meaning we can go back and select different colors any time we want. To change any of the colors, simply double-click on the color swatch for that fill layer in the Layers palette:
To change any of the colors, double-click on the color swatch icon for the fill color layer you want to change.
This will bring the Color Picker back up. Choose a different color, and then click OK. You can change any or all of the colors in the image whenever you want. I’ll go ahead and change all of the colors in my image.
The same effect using different colors.
And again, here’s the same image with different colors:
The same effect once again with different colors.
Save your completed effect as a Photoshop .PSD file so that you can open it again any time you need to and change the colors to create different results. And there we have it
In this tutorial, I will show you the steps I took to Create a Glowing Liquid Text Effect in Photoshop. We will be practising the use of liquify filter, layer blending options, as well as some image adjustments.
This is a beginner level tutorial and the steps are easy to follow (well, the hardest part may be the liquify filter usage), have a try!
Note: The Photoshop tutorial is done in CS6 – therefore some screenshot may have slighting different layout as in the earlier version.
Here is a preview of the final effect I have for this tutorial: (click to enlarge)
PSD File Download
You can download the PSD File for this tutorial via the VIP Members Area for only $6.95/Month (or less)! You will not only get this PSD File, but also 100+ other PSD Files + Extra Goodies + Exclusive Photoshop tutorials there. Signup now and get exclusive :) Find out more about the VIP Members Areas
OK Let’s get started!
To complete this tutorial, you will need the following stocks:
Step 1
Create a new document sized 1280px * 800px with black background. Load the Ground Texture stock image into Photoshop, and select a piece of the ground as shown below:
Copy and paste the selection onto our document, use a soft eraser to remove the edges and some parts of the ground as shown below:
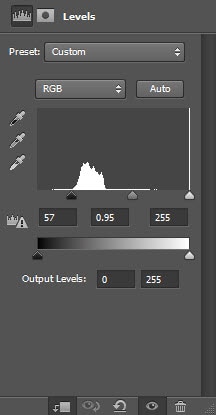
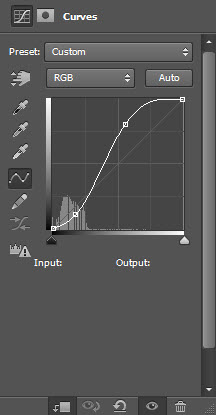
Add the following 3 adjustment layers on top of the ground texture layer:
Black and White
Levels
Curves
Create a new layer on top and add some cloud effect over the ground with either a cloud brush or the cloud filter – this adds some dramatic effect into it:
Step 2
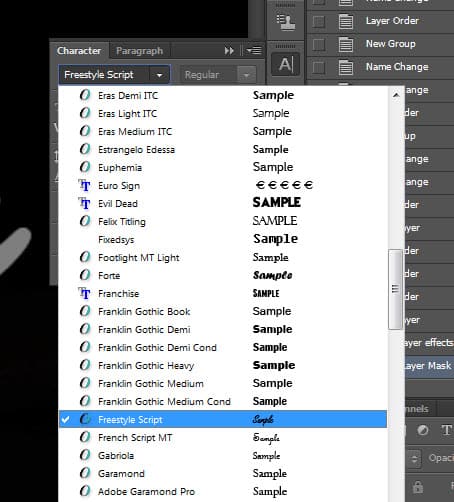
We will now add some text onto the document – I used the “Freestyle Script” font (should come with Photoshop):
Apply the following layer blending options to this text layer:
Bevel and Emboss
Color Overlay
Outer Glow
and you will have the following effect:
Step 3
We add some water pattern over the text – download the water pattern pack and choose one of the images, select a portion of it with any selection tool:
Copy and paste the selection over the text and set it as a clipping mask to the text layer:
We will go back to the water images and select a piece again, then copy and paste the selection and put it below the text layer, use the liquify filter’s forward warping tool to make it into a pattern as shown below:
This step can be a bit and you will probably need to have a few tries before getting it right. The effect below is the one you’re aiming to achieve:
Step 4
Load the water splash brush into Photoshop and paint some splash around the text, use a soft eraser to fade the edges of the splash for depth:
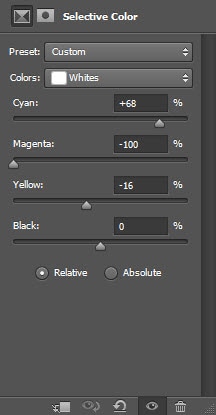
We will fine tune the colour effect a bit with the following image adjustment layer on top:
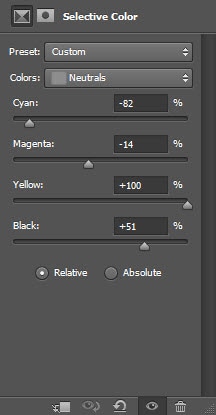
Selective Color
Cyans
Whites
Neutrals
Layer mask on the selective colour adjustment layer:
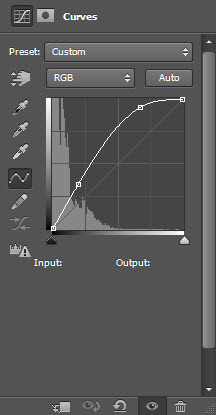
Curves
Layer mask on this curves adjustment layer:
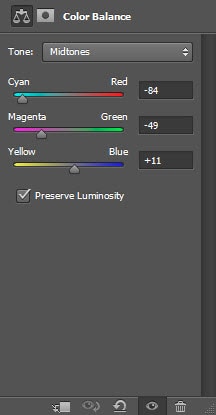
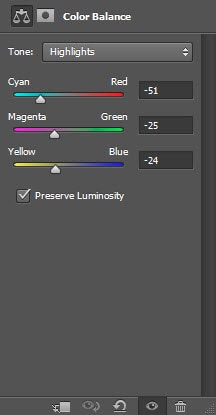
Color Balance
and you will have the following final image: (click to enlarge)
That’s it for this tutorial! Hope you enjoy it and find it useful! Till next time, have a great day
No comments:
Post a Comment